New Server
Contents
[hide]New Server/ Network
The minimal set of options which is required to have a functional new server is described under the Required header.
The full set of options is described afterwards, in the following sections.
Adding new server/ network is easy:
Press the Add button on the lower part of the Server tree.
A new server window is opened. This is the Server Editor window.
Required Settings
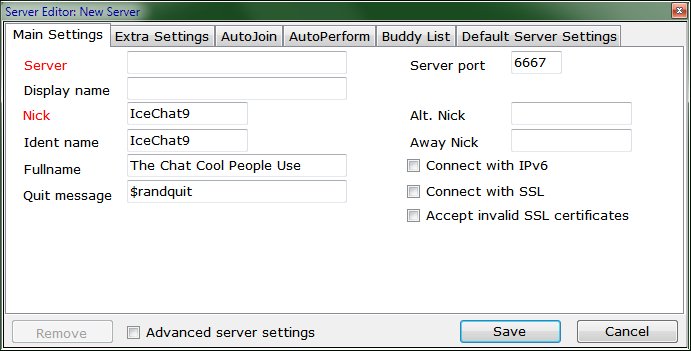
Main Settings tab
- Server:
- the name of the server to connect to. For example irc.freenode.net
- Nick:
- the username you wish to use on this server.
- By using the Connect button on the bottom of the Server tree list
- By right-click the server in the servers list, and selecting the 1st option there, Connect
- Display name:
- the name that will be displayed on the server tree list. for example my_nick@freenode
- Ident name:
- used as part of the host name on the nick list
- Quit message:
- when using the default $randquit, a random funny message is displayed when the user leaves a channel. Any message can be set instead.
- Port:
- The port used for the connection. If Alt nick and Away nick are left blank, IceChat9 sets them automatically based on the selected nick. Example:
- Connect with IPv6:
- for those who have IPv6 connection.
- Connect with SSL:
- if the server/network has an SSL connection. In this case, the port number should be changed accordigly.
- Accept invalid SSL certification:
- If the previous option is selected, it is highly recommended to check this option.
- Set mode +i on connect:
- sets the user mode to invisible when connected to the server. See Wikipedia for more on IRC modes.
- Show MOTD on connect:
- displays the server's Message of the Day.
- Show PING PONG message:
- By default these messages are not displayed. These messages test the connection with the server.
- Rejoin channels on connect:
- Whether to automatically rejoin the open channels when reconnecting to a disconnected server.
- Disable CTCP replies:
- If enabled, will disable sending CTCP replies to anyone who sends one
- Disable away/ return messages:
- If disabled, the client will not inform the server when the user is idle. TBV
- Connect on startup:
- Whether or not you want to connect to this server when the client starts.
- Ping timer (minutes):
- The interval for the PING messages.
- Encoding:
- The encoding to be used for the server. The default utf-8 value is recommended.
- Server password:
- If the server requires a password, enter it here
- Nickserv password:
- If you have registered your nick on the server, adding the password here will allow IceChat to identify with the nick server automatically. If the server supports SASL then you can check the Connect with SASL checkbox.
- Extended join:
- If enabled, the client will display extra information on a channel join
- Away notify:
- If enabled, the client will notify the server when the user is idle.
- Account notify:
- If enabled, the client will notify when a user in a channel has changes accounts in services
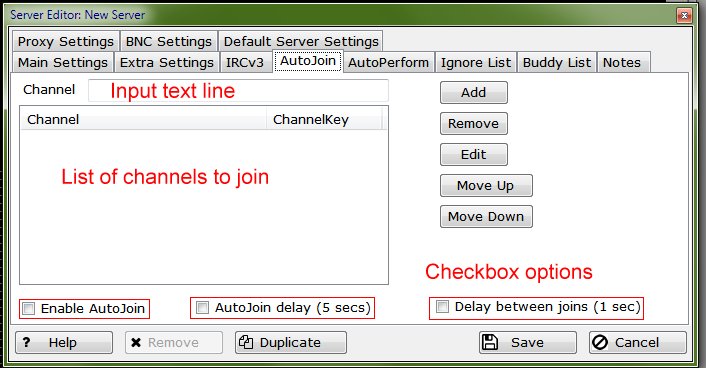
- Enable AutoJoin:
- This checkbox is enabled automatically when adding a channel for the first time. when unchecked, none of the channels on the list will be automatically joined.
- AutoJoin delay:
- Will delay joining to the first channel by the 5 seconds. This allows time for certain commands to be completed, such as the identification with the nick server.
- Delay between joins:
- If checked, there will be a delay of 1 second before each of the channels listed in the AutoJoin window is joined.
- The server name on the Server tree will be highlighted with the Buddy List color.
- The Console tab on the Channel Bar will be highlighted with the Buddy List color.
- The Buddy list window will list the nick under Connected or Disconnected according to that user's status.
- Display Name: It is possible to set a color for the server name on the Server tree the same way as setting the colors for Advanced messages.
AutoJoin tab
Type the channel/s name to which you want to join automatically. If the channel has a password (key), add a space after the channel's name, and then type the password. Press the Add button to add the channel to the list of AutoJoin channels.
Remember to add the # (pound) sign before the channel name.
After filling the above information, press the Save button.
The server is displayed on the Server tree list, and can be connected.
There are two ways to connect a server:
Default Settings
In addition to the above, the following settings are available:
Main Settings tab
Nick: IceChat9
Alt nick: IceChat9_
Away nick: IceChat9[A]
Extra Settings tab
The user and password would be the same as for the nick server. TBV
Auto Join tab
AutoPerform tab
This editor allows the user to perform commands after the server is connected.
The commands can be any regular IRC commands. TBC
Each command should be in a separate line, starting with / (slash) and ending with ; (semicolon).
The whole set of commands will only be performed if the Enable AutoPerform checkbox is checked.
Buddy List tab
If you want to be informed when certain users connect or disconnect to/ from this server, add their nicks to the list.
When a buddy connects or disconnects to/ from the server, there will be several indications:
Buddy list announcement will only be performed if the Enable Buddy list checkbox at the bottom, is checked.
Default Server Settings
This tab is shared among all the servers defined for IceChat 9. If no specific data is inserted when creating a new server, the values from this tab are used.
Advanced Settings
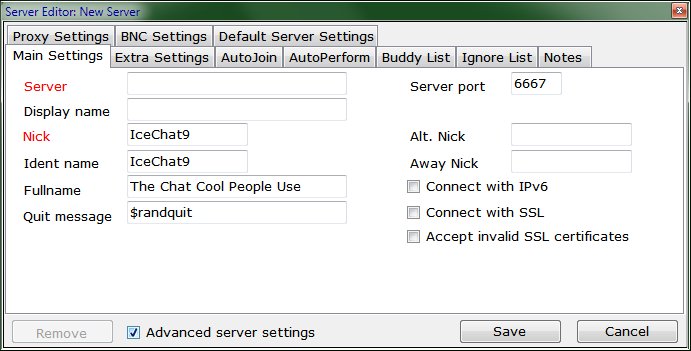
Pressing the Advanced server settings displays additional tabs.
Ignore List tab
This tab is similar in looks and UI to AutoJoin tab.
Adding any nick name to the list will prevent texts from this nick to be displayed on any of the channels of that server.
The . (dot) character can be used as wildcard.
Example:
Assuming several bots on channel(s) of a certain server, with the following nick names:
AnnounceBot
InfoBot
....
If you want to ignore them, you can add .bot to the Ignore List instead of listing each one separately.
The Ignore List will function only if the Enable Ignore List checkbox at the bottom is checked.
Notes tab
This is a place to keep some notes regarding this specific server. TBV
Proxy Settings tab
Check the Enable Proxy Connection checkbox if you need to connect through a Proxy Server.
Add the proxy information: IP address and Port number.
If the proxy requires username and password, add these as well.
Choose the relevant protocol as required by the proxy server from the list.
BNC Settings tab
Check the Enable BNC Connection checkbox if you need to connect to your BNC.
Add the BNC information: server address, port number.
If the BNC requires username and password, add these as well.


